PostgreSQL9.4のSSL証明書認証
Posted on March 10, 2015 at 19:38 (JST)
PostgreSQL9.4のSSL証明書認証を行うための方法を記載します。
リモートHOSTにログインするのはめんどい。でもID/Password認証だとちょっと不安。
ということで、SSL+クライアント証明書(認証X.509)を使用して開発環境からリモートDBを操作出来るようにしました。
(ついでに、DBサーバと同一ネットワークからの接続の場合はID/Password(MD5)による認証を行うよう設定)
【環境】
概要
下記の手順で操作を行います。
- DBサーバにて秘密鍵と証明書を作成
- 開発環境にて秘密鍵と証明書を作成
- DBサーバにて各種設定ファイルを編集する
- DBサーバにてPostgreSQLを再起動する
- 開発環境からDBサーバへ接続する
なお、PostgreSQLのインストール方法については割愛します。
1.DBサーバにて秘密鍵と証明書を作成
PostgreSQLのdataディレクトリに移動し、下記の操作を行います。
わたしの環境では /var/lib/pgsql/9.4/data です。
[root@remotedb data]# openssl genrsa -des3 -out server.key 2048
Generating RSA private key, 2048 bit long modulus
…………………………………………………………………+++
…………………………………+++
e is 65537 (0x10001)
Enter pass phrase for server.key:
Verifying - Enter pass phrase for server.key:
[root@remotedb data]# openssl req -new -x509 -days 3650 -key server.key -out server.crt
Enter pass phrase for server.key:
You are about to be asked to enter information that will be incorporated
into your certificate request.
What you are about to enter is what is called a Distinguished Name or a DN.
There are quite a few fields but you can leave some blank
For some fields there will be a default value,
If you enter ‘.’, the field will be left blank.
—–
Country Name (2 letter code) [XX]:JP
State or Province Name (full name) []:Tokyo
Locality Name (eg, city) [Default City]:
Organization Name (eg, company) [Default Company Ltd]:
Organizational Unit Name (eg, section) []:
Common Name (eg, your name or your server’s hostname) []:xxx.xxx.xxx.xxx
Email Address []:
[root@remotedb data]# openssl rsa -in server.key -out server.key
Enter pass phrase for server.key:
writing RSA key
Common NameにはサーバのIPアドレスを設定します。
ここで作成した証明書ファイル(server.crt)は開発マシンからの接続にも使用します。
2.開発環境にて秘密鍵と証明書を作成
サーバでの操作とほぼ同じです。
mac:postgresql user$ openssl genrsa -des3 -out postgresql.key 2048
Generating RSA private key, 2048 bit long modulus
……………………………………………..+++
……………….+++
e is 65537 (0x10001)
Enter pass phrase for postgresql.key:
Verifying - Enter pass phrase for postgresql.key:
mac:postgresql user$ openssl req -new -x509 -days 3650 -key postgresql.key -out postgresql.crt
Enter pass phrase for postgresql.key:
You are about to be asked to enter information that will be incorporated
into your certificate request.
What you are about to enter is what is called a Distinguished Name or a DN.
There are quite a few fields but you can leave some blank
For some fields there will be a default value,
If you enter ‘.’, the field will be left blank.
—–
Country Name (2 letter code) [AU]:JP
State or Province Name (full name) [Some-State]:Tokyo
Locality Name (eg, city) []:
Organization Name (eg, company) [Internet Widgits Pty Ltd]:
Organizational Unit Name (eg, section) []:
Common Name (e.g. server FQDN or YOUR name) []:postgres
Email Address []:
mac:postgresql user$ openssl rsa -in postgresql.key -out postgresql.key
Enter pass phrase for postgresql.key:
writing RSA key
Common NameにはPostgreSQLに登録してあるユーザー名を設定します。
ここで作成した証明書(postgresql.crt)はサーバでも使用するので、コピーをroot.crtにリネームしてサーバへデプロイしてください。
3.DBサーバにて各種設定ファイルを編集する
クライントから接続するために、下記2点のファイルを編集します。
- postgresql.conf
- pg_hba.conf
環境によってはiptablesのport設定が必要ですが、そちらについては割愛します。
[root@remotedb data]# echo “listen_addresses = ‘*‘” >> /var/lib/pgsql/9.4/data/postgresql.conf
[root@remotedb data]# echo “ssl = on” >> /var/lib/pgsql/9.4/data/postgresql.conf
[root@remotedb data]# echo “ssl_cert_file = ‘server.crt’” >> /var/lib/pgsql/9.4/data/postgresql.conf
[root@remotedb data]# echo “ssl_key_file = ‘server.key’” >> /var/lib/pgsql/9.4/data/postgresql.conf
[root@remotedb data]# echo “ssl_ca_file = ‘root.crt’” >> /var/lib/pgsql/9.4/data/postgresql.conf

[root@remotedb data]# cp /var/lib/pgsql/9.4/data/pg_hba.conf pg_hba.conf.bk
[root@remotedb data]# echo “host all all samenet md5” > /var/lib/pgsql/9.4/data/pg_hba.conf
[root@remotedb data]# echo “hostssl all all 0.0.0.0/0 cert clientcert=1” > /var/lib/pgsql/9.4/data/pg_hba.conf
postgresql.confの設定は上記コマンドによりファイルの末尾に追記しています。
pg_hba.confはデフォルト設定を破棄するために、ファイルの内容を書き換えています。
再起動失敗時の原因切り分けのために、編集前のバックアップを残しています。
※ root.crtは手順2で作成したpostgresql.crtのコピーです。
各項目の設定については下記サイトを参考にしました。
PostgreSQL 9.3.2文書 / 19.1. pg_hba.confファイル
4.DBサーバにてPostgreSQLを再起動する
作成したserver.key, server.crt, root.crtの権限を変更し、再起動します。
[root@remotedb data]# service postgresql-9.4 restart
5.開発環境からDBサーバへ接続する
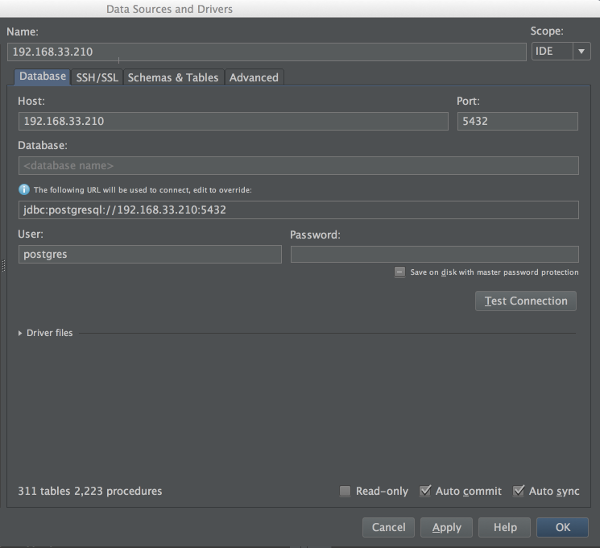
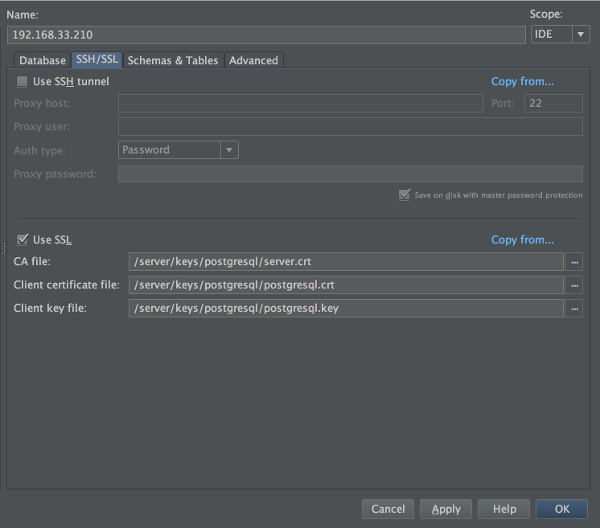
IDEAを使用して接続する場合の例は下記になります。

パスワードは不要。

CA file: にはサーバで作成したserver.crtのコピーを使用。
前画面に戻って[Test Connection]ボタンを押下すると、接続出来ます。
おまけ
クライアント証明書を作成する際、PostgreSQLに登録していないユーザーをCommonNameに指定すると接続に失敗し、サーバ上に下記のログが出ます。
[ /var/lib/pgsql/9.4/data/PG_LOG ]< 2015-03-10 19:28:28.611 JST >LOG: certificate authentication failed for user “postgres”: client certificate contains no user name
< 2015-03-10 19:28:28.611 JST >FATAL: certificate authentication failed for user “postgres”
< 2015-03-10 19:28:28.611 JST >DETAIL: Connection matched pg_hba.conf line 2: “hostssl all all 0.0.0.0/0 cert clientcert=1”
エラーメッセージが文字化けして困る場合、postgresql.confのlc_messagesの値を'ja_JP.UTF-8'から'C'へ変更することでエラーメッセージを英語化出来ます。
手順3で下記コマンドを叩いて上記変更を行うことが出来ます。
sed -ri "s/^(lc_messages\s=\s)\S+/\1'C'/" /var/lib/pgsql/9.4/data/postgresql.conf
今回は下記の書籍も参考にしています。
食べる!SSL! ―HTTPS環境構築から始めるSSL入門
PostgreSQL全機能バイブル
内部構造から学ぶPostgreSQL 設計・運用計画の鉄則 (Software Design plus)
以上です。